
Best Hot Chocolate Recipe (Rich, Creamy, Ready in 10 Minutes)
⭐⭐⭐⭐⭐ Rate this recipe
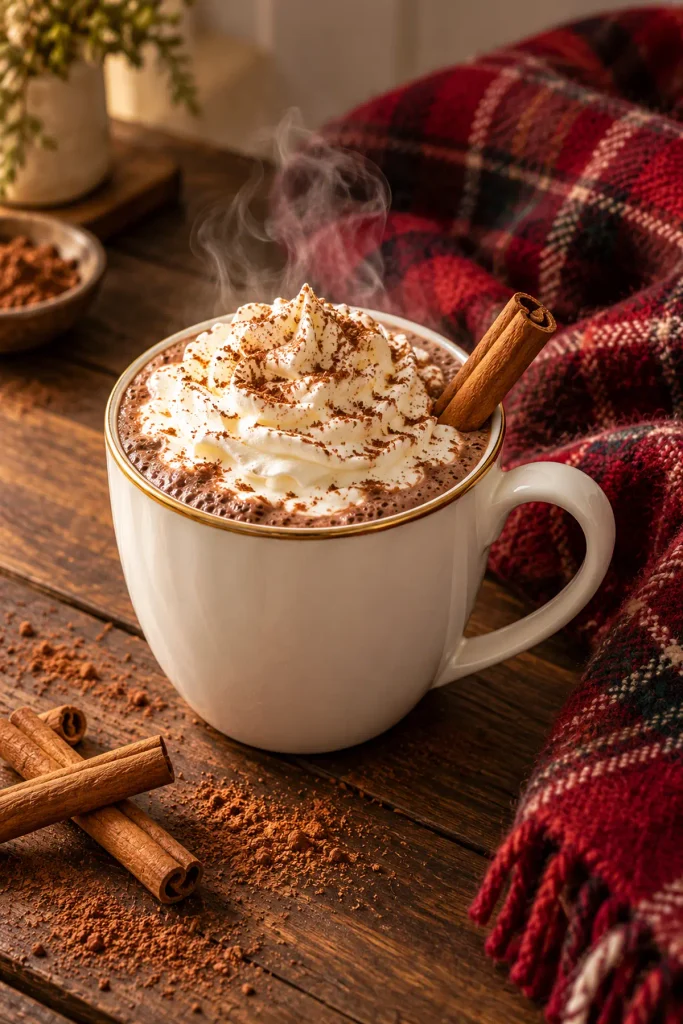
Hot chocolate made from scratch tastes nothing like the powdered packet version — this recipe produces a rich, velvety drink made with real melted chocolate and cocoa powder together, never grainy or watery. This Hot Chocolate recipe uses just 5 pantry ingredients and a specific whisking technique that keeps everything smooth from the first sip to the last. The whole batch comes together on the stovetop in 10 minutes.
This recipe is built for anyone who wants a genuinely rich, café-quality drink without any fancy equipment. If you’ve ever made hot chocolate that turned out thin, grainy, or separated into an oily layer on top — every one of those problems has a specific fix here. It works for a cold winter evening, a holiday gathering, or a simple treat after a long day.
Made this already? Scroll down and leave a ⭐⭐⭐⭐⭐ rating below — it helps more than you know.
Once you make real hot chocolate from scratch, the powdered packets will never feel worth it again.
By David | Last Updated: October 2026
⏱ Prep Time: 2 minutes
🕐 Cook Time: 8 minutes
⏳ Total Time: 10 minutes
🍽 Servings: 4 mugs
📊 Difficulty: Easy
💰 Estimated Cost: ~$3 total / ~$0.75 per mug
☕ Main Item: Rich, creamy stovetop hot chocolate
Table of Contents
Why This Hot Chocolate Recipe Works
- Real chocolate plus cocoa powder, not one or the other. Most hot chocolate recipes use only cocoa powder, which produces a flatter, chalkier flavor. This recipe combines melted real chocolate with cocoa powder, giving the drink both deep chocolate richness and the slightly bitter depth that cocoa powder alone can’t provide.
Best Rice Krispie Treats another cozy winter recipe here
- A cornstarch-free thickening method. Instead of relying on cornstarch, which can make hot chocolate taste starchy, this recipe uses a small amount of extra chocolate and a slow simmer to naturally thicken the drink while keeping the flavor completely clean.
- Whisking constantly, not just stirring occasionally. Most people stir hot chocolate a few times while it heats. This recipe whisks continuously, which is what prevents the grainy, separated texture that ruins so many homemade versions.
- Low, gentle heat the entire time. Here’s the truth: high heat scorches milk and chocolate almost instantly, producing a burnt aftertaste that no amount of sugar can mask. Low heat protects the flavor completely.
- A splash of heavy cream at the end. Added off the heat in the final step, the cream rounds out the texture into something genuinely velvety rather than thin and watery.
Understanding the Key Ingredient

I’ve made this Hot Chocolate recipe in my own kitchen more times than I can count — always for real cozy evenings, never just for testing. The one step I never skip, no matter how rushed I am, is the key technique in Step 2. Every single time I’ve tried cutting corners on it, the final drink suffered. Every time I followed it properly, the result was exactly right.
Why Real Chocolate Is the Right Choice
Real chocolate contains cocoa butter, which melts into the milk and creates a genuinely silky, rich mouthfeel that cocoa powder alone simply cannot replicate for this Hot Chocolate recipe. Cocoa powder has had most of its fat removed during processing, so while it contributes strong chocolate flavor, it can’t deliver the same luxurious texture on its own. Combining both gives you the best of each — the deep, slightly bitter complexity of cocoa powder and the smooth, melting richness of real chocolate.
Chocolate Comparison Guide
| Type | Flavor | Texture Result | Best For |
|---|---|---|---|
| Dark chocolate (60-70%) | Rich, slightly bitter | Silkiest, most complex | Best overall result |
| Semi-sweet chocolate | Balanced sweetness | Very smooth | Sweeter, crowd-pleasing version |
| Milk chocolate | Sweet, mild | Smooth but less complex | Kids or very sweet preference |
| Cocoa powder only | Flat, chalky | Thinner, less rich | Last resort — missing texture |
How to Choose the Best at the Store
- Look for a high cocoa percentage. Chocolate bars labeled 60–70% cocoa produce the richest, most balanced flavor for this Hot Chocolate recipe.
- Avoid chocolate chips with stabilizers. Baking chips often contain additives that prevent smooth melting — a solid chocolate bar melts more reliably.
- Check the ingredient list for real cocoa butter. Chocolate listing cocoa butter near the top melts into a silkier texture than cheaper bars using vegetable oil substitutes.
- Buy unsweetened cocoa powder, not hot cocoa mix. Hot cocoa mix already contains sugar and fillers that throw off this recipe’s balance.
- Fresh cocoa powder smells strong. If it smells faint or dusty, it’s likely old and will produce a weaker flavor.
How Much Do You Need?
| Servings | Milk | Chocolate | Cocoa Powder |
|---|---|---|---|
| 2 mugs | 2 cups | 2 oz | 2 tbsp |
| 4 mugs | 4 cups | 4 oz | ¼ cup |
| 6 mugs | 6 cups | 6 oz | ⅓ cup |
| 8 mugs | 8 cups | 8 oz | ½ cup |
Double Batch — How to Scale This Hot Chocolate Recipe
Doubling this recipe works cleanly — double every ingredient exactly, but use a larger pot to prevent the milk from boiling over as it heats. Keep the heat low throughout regardless of batch size; a bigger volume of milk doesn’t need higher heat, just slightly more patience while it warms. Whisk continuously the entire time, especially with a larger batch, since more liquid surface area means more opportunity for a skin to form on top.
Ingredients You’ll Need

This Hot Chocolate recipe uses just five simple ingredients. Here is everything broken down.
Main Ingredients
- Whole milk — 4 cups. The base of the drink. Whole milk produces a noticeably richer result than low-fat milk, since the fat content carries the chocolate flavor more fully.
- Dark chocolate — 4 oz, finely chopped. Melts directly into the milk for deep richness and a silky texture that cocoa powder alone can’t achieve.
- Unsweetened cocoa powder — ¼ cup. Adds intense chocolate flavor and a subtle bitterness that balances the sweetness.
- Granulated sugar — ¼ cup. Sweetens the drink without overpowering the chocolate flavor.
- Heavy cream — ¼ cup. Stirred in off the heat at the very end for a velvety, luxurious finish.
Supporting Ingredients
- Salt — a pinch. Balances the sweetness and intensifies the chocolate flavor noticeably.
- Vanilla extract — 1 teaspoon. Rounds out the flavor with warmth.
- Whipped cream and cocoa powder — for serving. The classic finishing touch for any mug of this Hot Chocolate recipe.
Optional Additions Table
| Add-In | Amount | Effect |
|---|---|---|
| Cinnamon stick | 1 per batch | Warm spice note simmered directly in the milk |
| Peppermint extract | ¼ tsp | Classic holiday flavor |
| Espresso powder | ½ tsp | Deepens the chocolate flavor noticeably |
| Orange zest | 1 tsp | Bright citrus note that pairs beautifully with chocolate |
| Marshmallows | ½ cup | Classic topping, melts slightly into the warm drink |
Complete Substitutions Reference
| Original | Substitution | Notes |
|---|---|---|
| Whole milk | 2% milk | Slightly less rich, still works well |
| Whole milk | Oat milk or almond milk | Good dairy-free option, slightly thinner |
| Dark chocolate | Semi-sweet chocolate chips | Sweeter overall result |
| Heavy cream | Half-and-half | Less rich but still adds some creaminess |
| Granulated sugar | Brown sugar | Adds a subtle caramel note |
What NOT to Add to This Hot Chocolate Recipe
❌ Boiling the milk — high heat scorches the milk proteins and produces a burnt, bitter undertone that ruins the flavor
❌ Hot cocoa mix instead of real cocoa powder — the sugar and fillers already in cocoa mix throw off this recipe’s carefully balanced ratios
❌ Cornstarch to thicken — it produces a starchy aftertaste; the chocolate and cream naturally thicken the drink without it
❌ Cold chocolate added all at once — it seizes and clumps instead of melting smoothly; always add gradually while whisking
❌ Skipping the whisk for a spoon — stirring instead of whisking allows a skin to form and makes the texture uneven
❌ Pre-shredded or coated chocolate chips — anti-caking additives can prevent smooth melting compared to a solid chopped chocolate bar
Equipment You’ll Need
Choosing the Right Equipment for Hot Chocolate
| Tool | Purpose | Best For |
|---|---|---|
| Small stainless steel saucepan | Heating | Even heat distribution |
| Whisk | Mixing | Prevents graininess and skin formation |
| Milk frother | Finishing | Extra foamy, café-style texture |
| Slow cooker | Batch serving | Keeps a large batch warm for a party |
Other Tools That Actually Matter
A good whisk is the single most important tool for this Hot Chocolate recipe — it incorporates the cocoa powder and melting chocolate far more smoothly than a spoon ever could. A heatproof measuring cup makes pouring the finished drink into mugs without spilling significantly easier. A fine grater is useful for shaving extra chocolate on top as a finishing garnish.
No Saucepan? Alternatives That Work for This Hot Chocolate Recipe
- Microwave method — heat milk in a microwave-safe bowl in 1-minute bursts, whisking in chocolate and cocoa powder between each burst
- Slow cooker on low — combine all ingredients and heat for 1–2 hours, whisking occasionally; ideal for keeping a batch warm for a party
- Electric kettle plus bowl — heat milk in an electric kettle, then whisk it into chocolate and cocoa powder in a heatproof bowl
How to Make Hot Chocolate — Step by Step
Five steps. Most take under two minutes each.
Step 1 — Heat the Milk Gently

Pour the milk into a saucepan over low to medium-low heat. Warm gently, stirring occasionally, until small bubbles start forming at the edges — about 3–4 minutes. Do not let the milk come to a full boil at any point in this Hot Chocolate recipe; boiling scorches the proteins and produces a burnt undertone that’s impossible to fix afterward.
💡 Pro Tip: Watch the edges of the pan closely — tiny bubbles forming there is your cue that the milk is at the right temperature, well before it would ever reach a visible boil in the center.
Step 2 — Whisk in the Chocolate and Cocoa (The Key Step)

Add the chopped chocolate, cocoa powder, sugar, and salt to the warm milk. Whisk constantly and vigorously until the chocolate is completely melted and the mixture looks smooth and glossy — about 3–4 minutes. Most people switch to occasional stirring here, but this Hot Chocolate recipe depends on continuous whisking to prevent the cocoa powder from clumping and the chocolate from sinking to the bottom and scorching. Every single time this step is rushed, the final drink turns out grainy instead of silky.
💡 Pro Tip: Add the chocolate in small handfuls rather than all at once — it melts more evenly and reduces the risk of clumping.
Step 3 — Simmer Briefly to Thicken
Reduce the heat slightly and let the mixture simmer gently for 2–3 minutes, whisking occasionally, until it thickens just slightly and coats the back of a spoon. Most importantly, keep the heat low during this stage — a rolling simmer or boil breaks the emulsion and can cause the drink to separate. As a result, a properly simmered batch looks glossy and slightly thickened, never bubbling aggressively.
💡 Pro Tip: If you want a thicker, European-style hot chocolate, simmer 1–2 minutes longer — the reduction concentrates the flavor and thickens it further.
Step 4 — Finish with Cream and Vanilla
Remove the pan from heat completely. Stir in the heavy cream and vanilla extract, whisking just until fully incorporated. Adding the cream off the heat, rather than simmering it, is what gives this Hot Chocolate recipe its final velvety texture without any risk of the cream curdling from direct heat exposure.
Best Pizza Dough Recipe another easy cozy drink recipe here
💡 Pro Tip: Taste before pouring and adjust sweetness here if needed — this is your last chance to balance the flavor before serving.
Step 5 — Pour and Top

Pour immediately into mugs while still hot. Top with whipped cream, a light dusting of cocoa powder, or mini marshmallows. Serve right away — this Hot Chocolate recipe tastes best in the first few minutes while it’s still steaming and the toppings are fresh.
How to Tell When Hot Chocolate Is Done
In my kitchen, I’ve learned to trust the texture over the clock for this Hot Chocolate recipe — but every stove runs a little differently, so watch the consistency closely on your first attempt. Once you’ve made it once, you’ll know exactly what to look for.
Primary Doneness Test
The drink is ready when it looks glossy and smooth with zero visible lumps of chocolate or cocoa powder, and it coats the back of a spoon in a thin, even layer rather than running off immediately like plain milk. A quick taste should reveal rich chocolate flavor without any starchy or chalky aftertaste.
Doneness Guide
| Indicator | What It Means | What to Do |
|---|---|---|
| Lumps still visible | Chocolate not fully melted | Continue whisking over low heat |
| Mixture looks thin and watery | Hasn’t simmered long enough | Simmer 1–2 more minutes |
| Mixture coats the back of a spoon | Perfectly thickened | Remove from heat |
| Surface looks oily or separated | Overheated or boiled | Whisk vigorously off heat to recombine |
| Mixture is glossy and smooth | Done | Add cream and serve |
| Bottom of pan shows scorching | Heat was too high | Start over with lower heat next time |
Visual Signs It’s Done
- The mixture has transformed from pale, chunky milk into a deep, uniform brown
- The surface looks glossy and slightly thickened, not thin or watery
- No visible lumps of unmelted chocolate or clumped cocoa powder remain
- Small bubbles at the edges have calmed into a gentle simmer, not a rolling boil
- A spoon dipped in and lifted shows an even coating, not drips running off immediately
It’s Not Right — What to Do Now
- Drink turned out grainy: Cocoa powder wasn’t whisked in thoroughly enough — strain through a fine sieve to salvage it, and whisk more vigorously next time
- Drink separated or looks oily: The mixture was boiled instead of simmered — whisk vigorously off heat to recombine, and use lower heat next batch
- Drink is too thin: Didn’t simmer long enough to thicken — return to low heat and simmer 1–2 more minutes
- Drink tastes burnt: Milk or chocolate scorched on the bottom of the pan — unfortunately this can’t be fixed; start over with lower heat
How to Get the Creamiest Texture


Getting that genuinely velvety, café-quality texture comes down to technique more than any single ingredient. There are three approaches depending on how indulgent you want this Hot Chocolate recipe to be.
Method 1 — Classic Stovetop Method (Standard Recipe)
Warm milk gently, whisk in chocolate and cocoa powder, simmer briefly, then finish with cream off the heat. This is the method used throughout this recipe and the one that most reliably produces a smooth, rich result without any special equipment.
Method 2 — Extra Rich Method (Best Texture)
Replace half the milk with additional heavy cream for an exceptionally thick, dessert-like version. Reduce the sugar slightly since the cream itself has a subtle natural sweetness. This version is noticeably more indulgent and worth making for a special occasion or holiday gathering.
Method 3 — Frothed Method (Café Style)
After finishing the drink, use a milk frother or immersion blender for 10–15 seconds to create a light, airy foam on top before pouring. This mimics the frothy texture of café-style hot chocolate without needing an espresso machine.
Troubleshooting Quick Reference
| Problem | Cause | Fix |
|---|---|---|
| Grainy texture | Cocoa powder not whisked thoroughly | Strain through a fine sieve |
| Separated or oily surface | Overheated or boiled | Whisk vigorously off heat |
| Too thin | Under-simmered | Simmer 1–2 more minutes |
| Too thick | Over-simmered or too much chocolate | Whisk in a splash more warm milk |
What to Serve With Hot Chocolate
Classic Pairings That Always Work
- Whipped cream — the most classic topping; a generous dollop melts slightly into the warm drink
- Mini marshmallows — the nostalgic favorite that softens slightly on top
- Buttered toast or croissants — a simple pairing for a cozy breakfast or afternoon treat
- Shortbread cookies — the buttery crumb pairs beautifully with rich chocolate
- A cinnamon stick for stirring — adds a warm spice note with every sip
Comfort Food Pairings
- Gingerbread cookies — a classic holiday pairing that works especially well in winter
- Churros — the cinnamon-sugar coating complements the chocolate flavor perfectly
- Chocolate chip cookies — for anyone who wants double the chocolate in one sitting
- Caramel drizzle on top — adds a sweet, buttery contrast to the rich chocolate
- Peppermint bark pieces — crushed on top for a festive holiday finish
Low-Sugar Options
- Reduce the sugar by half — the chocolate still provides plenty of flavor without full sweetness
- Use a sugar substitute — swaps in cleanly without affecting the melting process
- Skip the whipped cream topping — the biggest sugar reduction comes from simplifying the garnish
6 Ways to Use Leftover Hot Chocolate

Leftover hot chocolate can become several completely different treats. Here are 6 ways to use it.
Hot Chocolate Milkshake
What you need: Leftover hot chocolate, 2 scoops vanilla ice cream.
How to assemble: Blend leftover hot chocolate with ice cream until smooth. Pour into a glass and top with whipped cream and chocolate shavings.
One tip: Chill the leftover hot chocolate in the fridge for at least an hour before blending — it makes a noticeably thicker milkshake.
Hot Chocolate Pudding Cups
What you need: Leftover hot chocolate, 1 tbsp cornstarch mixed with 2 tbsp cold water.
How to assemble: Whisk the cornstarch slurry into reheated leftover hot chocolate over low heat until thickened, about 3–4 minutes. Pour into small cups and chill for 2 hours before serving.
One tip: This is one of the easiest ways to turn leftover drink into a completely different dessert with almost no extra ingredients.
Hot Chocolate Popsicles
What you need: Leftover hot chocolate, popsicle molds.
How to assemble: Pour cooled leftover hot chocolate into popsicle molds and freeze for at least 4 hours.
One tip: Add a few mini marshmallows into each mold before freezing for a fun textural surprise.
Hot Chocolate Pancakes
What you need: Pancake batter, ¼ cup leftover hot chocolate.
How to assemble: Stir leftover hot chocolate directly into your usual pancake batter in place of some of the milk.
Best Pizza Dough Recipe see more easy breakfast ideas here
One tip: The chocolate flavor infuses the pancakes throughout rather than just sitting on top as a drizzle.
Hot Chocolate Affogato
What you need: Leftover hot chocolate, 1 scoop vanilla ice cream.
How to assemble: Reheat leftover hot chocolate until warm again. Pour over a scoop of vanilla ice cream in a small glass or bowl.
One tip: Serve immediately — the contrast between warm chocolate and cold ice cream is the entire point of this dessert.
Hot Chocolate Brownie Batter Mix-In
What you need: Leftover hot chocolate, brownie mix.
How to assemble: Replace the water called for in a boxed brownie mix with an equal amount of leftover hot chocolate.
One tip: This adds noticeably deeper chocolate flavor to boxed brownies with almost no extra effort.
Storage, Freezing and Reheating Guide
Refrigerator Storage (Up to 4 Days)
This Hot Chocolate recipe stores in the refrigerator for up to 4 days in an airtight container. The mixture may thicken further once chilled — this is completely normal and simply means it needs a splash of milk when reheating.
Can You Make This Hot Chocolate Recipe Ahead of Time?
Yes — this recipe reheats beautifully, which makes it an excellent make-ahead option for gatherings. Make the full batch up to 4 days ahead, refrigerate, and reheat gently on the stovetop or in the microwave when ready to serve.
Freezer Storage (Up to 2 Months)
This Hot Chocolate recipe freezes well for up to 2 months. Pour into an airtight container or ice cube trays for individual portions, leaving room for expansion. Thaw overnight in the refrigerator before reheating gently on the stovetop.
This Recipe Works as a Make-Ahead Party Drink
Make a large batch the day before any holiday gathering, refrigerate, and reheat in a slow cooker on low for 1–2 hours before guests arrive. This keeps the drink warm and ready to serve all evening without any last-minute stovetop work.
Best Waffles Recipe see more cozy holiday recipes here
How to Reheat Without Ruining It
| Method | Setting | Time | Notes |
|---|---|---|---|
| Stovetop | Low heat | 5–6 min | Best method; whisk constantly to prevent separation |
| Microwave | 70% power | 1–2 min | Stir every 30 seconds to maintain smooth texture |
| Slow cooker | Low | 1–2 hrs | Best for keeping a batch warm for a party |
Weekly Prep Strategy
Make a batch at the start of the week and store refrigerated. This Hot Chocolate recipe reheats in under 5 minutes, making it a genuinely easy cozy drink to have ready all week during colder months.
Recipe Variations Worth Trying
Same technique. Completely different flavor profiles. Master this base Hot Chocolate recipe first — then try one of these.
Most Popular — Peppermint Hot Chocolate
Add ¼ teaspoon of peppermint extract along with the vanilla in Step 4. Top with crushed candy canes and whipped cream. This is the most requested holiday variation of this Hot Chocolate recipe, especially around Christmas.
International — Mexican Spiced Hot Chocolate
Add ½ teaspoon of ground cinnamon and a small pinch of cayenne pepper along with the cocoa powder in Step 2. The subtle heat builds slowly and contrasts beautifully with the rich chocolate, reflecting the traditional Mexican approach to hot chocolate that dates back centuries.
Low-Sugar — Reduced Sugar Version
Cut the granulated sugar to 2 tablespoons and rely more on the natural sweetness of the dark chocolate itself. Therefore, you get a noticeably less sweet, more intensely chocolatey version that still tastes rich and satisfying for this Hot Chocolate recipe.
Quick Shortcut — Microwave Mug Version
Combine all ingredients for a single serving directly in a large mug and microwave in 45-second bursts, whisking between each, until hot and smooth — about 2–3 bursts total. This skips the saucepan entirely for a single-serving version in under 3 minutes.
Fresh and Elevated — Salted Caramel Hot Chocolate
Stir in 2 tablespoons of caramel sauce along with the cream in Step 4, and top with a pinch of flaky sea salt. The combination of salty and sweet adds a sophisticated depth that elevates this simple drink into something genuinely special.
Nutrition Information
Per Serving Breakdown (Based on 4 Mugs)
| Nutrient | Amount | % Daily Value |
|---|---|---|
| Calories | ~280 | — |
| Total Fat | 15g | 19% |
| Saturated Fat | 9g | 45% |
| Cholesterol | 35mg | 12% |
| Sodium | 90mg | 4% |
| Total Carbohydrates | 30g | 11% |
| Dietary Fiber | 3g | 11% |
| Total Sugars | 24g | — |
| Protein | 8g | 16% |
| Calcium | 240mg | 18% |
According to USDA FoodData Central, whole milk provides a significant source of calcium per cup — making this Hot Chocolate recipe a surprisingly nutrient-rich winter drink alongside its rich chocolate flavor.
Dietary Compatibility
| Diet | Compatible | Notes |
|---|---|---|
| Gluten-Free | ✅ | Naturally gluten-free as written |
| Dairy-Free | ❌ | Replace milk and cream with oat milk and coconut cream |
| Paleo | ❌ | Sugar and dairy excluded |
| Keto | ❌ | High in sugar from chocolate and granulated sugar |
| Vegetarian | ✅ | No meat in this recipe |
| Vegan | ❌ | Requires dairy-free milk, cream, and chocolate to adapt |
To reduce sugar in this Hot Chocolate recipe, cut the granulated sugar to 2 tablespoons and rely on the chocolate’s natural sweetness — the flavor stays rich without tasting overly sweet.
8 Mistakes That Ruin Hot Chocolate
Every one of these mistakes in this Hot Chocolate recipe is fixable. Know them before you start — not after.
❌ Mistake 1: Boiling the Milk
Why it happens: Rushing to heat it faster. What goes wrong: Boiling scorches the milk proteins and produces a burnt, bitter undertone that ruins the entire batch. The fix: Keep the heat low to medium-low and watch for small bubbles at the edges — never a full rolling boil.
❌ Mistake 2: Stirring Instead of Whisking
Why it happens: A spoon feels more natural. What goes wrong: Stirring allows cocoa powder to clump and a skin to form on top, producing an uneven, grainy texture. The fix: Always whisk continuously, especially while adding the chocolate and cocoa powder.
❌ Mistake 3: Using Hot Cocoa Mix Instead of Real Cocoa Powder
Why it happens: It’s already sweetened, so it seems simpler. What goes wrong: The extra sugar and fillers already in cocoa mix throw off this recipe’s balanced ratios, making the drink overly sweet or oddly textured. The fix: Use plain, unsweetened cocoa powder and add sugar separately as the recipe specifies.
❌ Mistake 4: Adding Chocolate All at Once
Why it happens: Wanting to save time. What goes wrong: A large amount of cold chocolate dropped in at once can seize and clump instead of melting smoothly. The fix: Add chocolate in small handfuls while whisking constantly.
❌ Mistake 5: Skipping the Simmer Step
Why it happens: Thinking the drink is done once the chocolate melts. What goes wrong: Without a brief simmer, the texture stays thin and watery instead of developing the slightly thickened, velvety consistency this recipe is built for. The fix: Always simmer gently for 2–3 minutes after the chocolate melts.
❌ Mistake 6: Adding Cream While Still Over Heat
Why it happens: Trying to save a step by adding everything together. What goes wrong: Cream can curdle or separate if simmered directly, breaking the smooth texture. The fix: Always remove the pan from heat completely before stirring in the cream.
❌ Mistake 7: Using Low-Fat or Skim Milk
Why it happens: Trying to make a lighter version. What goes wrong: Less fat means less richness — the drink comes out noticeably thinner and less satisfying. The fix: Whole milk is worth using for this recipe; the fat content carries the chocolate flavor properly.
❌ Mistake 8: Letting It Sit Too Long Before Serving
Why it happens: Multitasking while it’s ready. What goes wrong: A skin forms on top and the drink cools faster than expected, losing its ideal steaming-hot texture. The fix: Pour and serve this Hot Chocolate recipe immediately once it’s finished.
Frequently Asked Questions
What is the difference between hot chocolate and hot cocoa?
Hot chocolate is traditionally made with real melted chocolate, which contains cocoa butter and produces a richer, silkier texture. Hot cocoa is typically made with cocoa powder alone, which has had most of the fat removed during processing, resulting in a thinner, less luxurious drink. This Hot Chocolate recipe combines both real chocolate and cocoa powder specifically to get the best qualities of each — the deep flavor of cocoa powder and the velvety texture of real chocolate.
Why is my hot chocolate grainy?
The most common cause is cocoa powder that wasn’t whisked in thoroughly enough, leaving small clumps that create a gritty texture. Switching from a spoon to a proper whisk and whisking continuously while adding the cocoa powder solves this almost every time. If graininess still happens, straining the finished drink through a fine mesh sieve before serving removes any remaining lumps without affecting the flavor.
What is the best chocolate to use for hot chocolate?
Dark chocolate in the 60–70% cocoa range produces the richest, most balanced flavor for this Hot Chocolate recipe — it’s intense enough to stand up to the milk without becoming overly sweet. Semi-sweet chocolate works well for a slightly sweeter, more crowd-pleasing version. Milk chocolate is the mildest option and works best for kids or anyone who prefers a less intense chocolate flavor.
Can you make hot chocolate ahead of time?
Yes — this Hot Chocolate recipe reheats beautifully, making it an excellent make-ahead choice for gatherings. Make the full batch up to 4 days ahead and store it refrigerated in an airtight container. Reheat gently on the stovetop over low heat, whisking constantly, or in the microwave in short bursts, stirring between each.
How do you make hot chocolate creamier?
The honest answer: stir in heavy cream off the heat at the very end, which is exactly what this recipe does in Step 4. For an even richer version, replace half the milk with additional heavy cream. A milk frother used for 10–15 seconds after finishing also adds a light, airy foam that makes the texture feel even more luxurious.
Can you freeze hot chocolate?
Yes — it freezes well for up to 2 months. Pour into an airtight container or portion into ice cube trays, leaving room for expansion as it freezes. Thaw overnight in the refrigerator, then reheat gently on the stovetop, whisking constantly to restore the smooth texture.
What do you serve with hot chocolate?
Whipped cream and mini marshmallows are the classic toppings that work best with this Hot Chocolate recipe. For a cozy pairing, shortbread cookies or buttered toast complement the rich chocolate flavor beautifully. During the holidays, gingerbread cookies or churros make especially festive accompaniments alongside a steaming mug.
How long does homemade hot chocolate last in the fridge?
This Hot Chocolate recipe lasts up to 4 days in the refrigerator stored in an airtight container. The mixture may thicken noticeably once chilled — this is completely normal and just means it needs a splash of milk and gentle reheating with constant whisking to return to its original smooth texture.
Can you make hot chocolate without milk?
Yes — oat milk or almond milk both work as dairy-free substitutes, though the result will be slightly thinner than the whole-milk version since plant-based milks generally contain less fat. Using full-fat coconut milk produces a richer, more similar texture to the original recipe, though it does add a subtle coconut flavor that pairs surprisingly well with chocolate.
Why does my hot chocolate separate or curdle?
This almost always happens when the mixture is boiled rather than gently simmered, or when cream is added while the pan is still over direct heat. High heat breaks the emulsion between the fat and liquid, causing an oily or separated appearance. The fix is keeping the heat low throughout the entire process and always removing the pan from heat completely before stirring in the cream.
You Might Also Like
Classic Chai Tea Latte
Sweet Potato Casserole check out this recipe next
Recipe Card


HOT CHOCOLATE
Ingredients
Equipment
Method
- Warm milk over low to medium-low heat until small bubbles form at the edges, about 3–4 minutes.
- Whisk in chopped chocolate, cocoa powder, sugar, and salt. Whisk constantly until smooth and glossy, 3–4 minutes.
- Reduce heat slightly and simmer gently, whisking occasionally, 2–3 minutes until thickened.
- Remove from heat. Stir in heavy cream and vanilla extract until fully incorporated.
- Pour into mugs and top with whipped cream, cocoa powder, or marshmallows. Serve immediately.
Notes
✅ Whisk continuously, especially while adding chocolate and cocoa powder — this prevents graininess.
🔄 No dark chocolate? Semi-sweet or milk chocolate both work for a sweeter result.
❄️ Refrigerate up to 4 days or freeze up to 2 months. Reheat gently, whisking constantly.
📌 Always add the cream off the heat — this is what gives the final velvety texture. Make Ahead + Freezer Notes
Make the full batch up to 4 days ahead and refrigerate. Freeze in an airtight container or ice cube trays up to 2 months; thaw overnight and reheat gently on the stovetop.
🍽 HOT CHOCOLATE
⭐⭐⭐⭐⭐ [Star rating widget placeholder]
Rich, creamy homemade hot chocolate made with real chocolate and cocoa powder — the best cozy drink ready in just 10 minutes.
| Prep | 2 min |
| Cook | 8 min |
| Total | 10 min |
| Servings | 4 mugs |
| Calories | ~280 per mug |
| Course | Drinks / Beverage |
| Cuisine | American |
| Estimated Cost | ~$3 total / ~$0.75 per mug |
| Keywords | hot chocolate, homemade hot chocolate, winter drink, cozy drink, chocolate recipe |
Equipment
- Small stainless steel saucepan
- Whisk
- Heatproof measuring cup
- Mugs for serving
Ingredients
- 4 cups whole milk
- 4 oz dark chocolate, finely chopped
- ¼ cup unsweetened cocoa powder
- ¼ cup granulated sugar
- ¼ cup heavy cream
- Pinch of salt
- 1 tsp vanilla extract
Instructions
- Warm milk over low to medium-low heat until small bubbles form at the edges, about 3–4 minutes.
- Whisk in chopped chocolate, cocoa powder, sugar, and salt. Whisk constantly until smooth and glossy, 3–4 minutes.
- Reduce heat slightly and simmer gently, whisking occasionally, 2–3 minutes until thickened.
- Remove from heat. Stir in heavy cream and vanilla extract until fully incorporated.
- Pour into mugs and top with whipped cream, cocoa powder, or marshmallows. Serve immediately.
Recipe Notes
⚠️ Never boil the milk — it scorches and produces a burnt, bitter undertone.
✅ Whisk continuously, especially while adding chocolate and cocoa powder — this prevents graininess.
🔄 No dark chocolate? Semi-sweet or milk chocolate both work for a sweeter result.
❄️ Refrigerate up to 4 days or freeze up to 2 months. Reheat gently, whisking constantly.
📌 Always add the cream off the heat — this is what gives the final velvety texture.
Make Ahead + Freezer Notes
Make the full batch up to 4 days ahead and refrigerate. Freeze in an airtight container or ice cube trays up to 2 months; thaw overnight and reheat gently on the stovetop.
Nutrition Per Serving
Calories: ~280 | Protein: 8g | Fat: 15g | Carbs: 30g | Fiber: 3g | Sodium: ~90mg
Dietary Info
✅ Gluten-Free | ❌ Dairy-Free | ❌ Paleo | ❌ Keto | ✅ Vegetarian | ❌ Vegan
Did You Make This?
Tag @DavidRecipes and leave a ⭐⭐⭐⭐⭐ rating below.
— David | DavidRecipes
David is a home cook who has spent years developing straightforward, no-fuss recipes that work for real weeknight kitchens. Every recipe on DavidRecipes is made, tested, and eaten before it ever gets published — usually multiple times.


3 Comments